OAuth Quickstart Guide
In order to connect Teachable to a third-party application via OAuth, the following steps are required:
- The school owner registers the third-party application from within their school admin.
- The user is directed to an authorization URL for the app.
- The user reviews the requested permissions and grants the app access.
- The user is redirected back to the app with a unique authorization code.
- The app uses that authorization code to make a request to the Teachable OAuth API, and in exchange receives an access token.
- The access token is used to make API calls on behalf of the user.
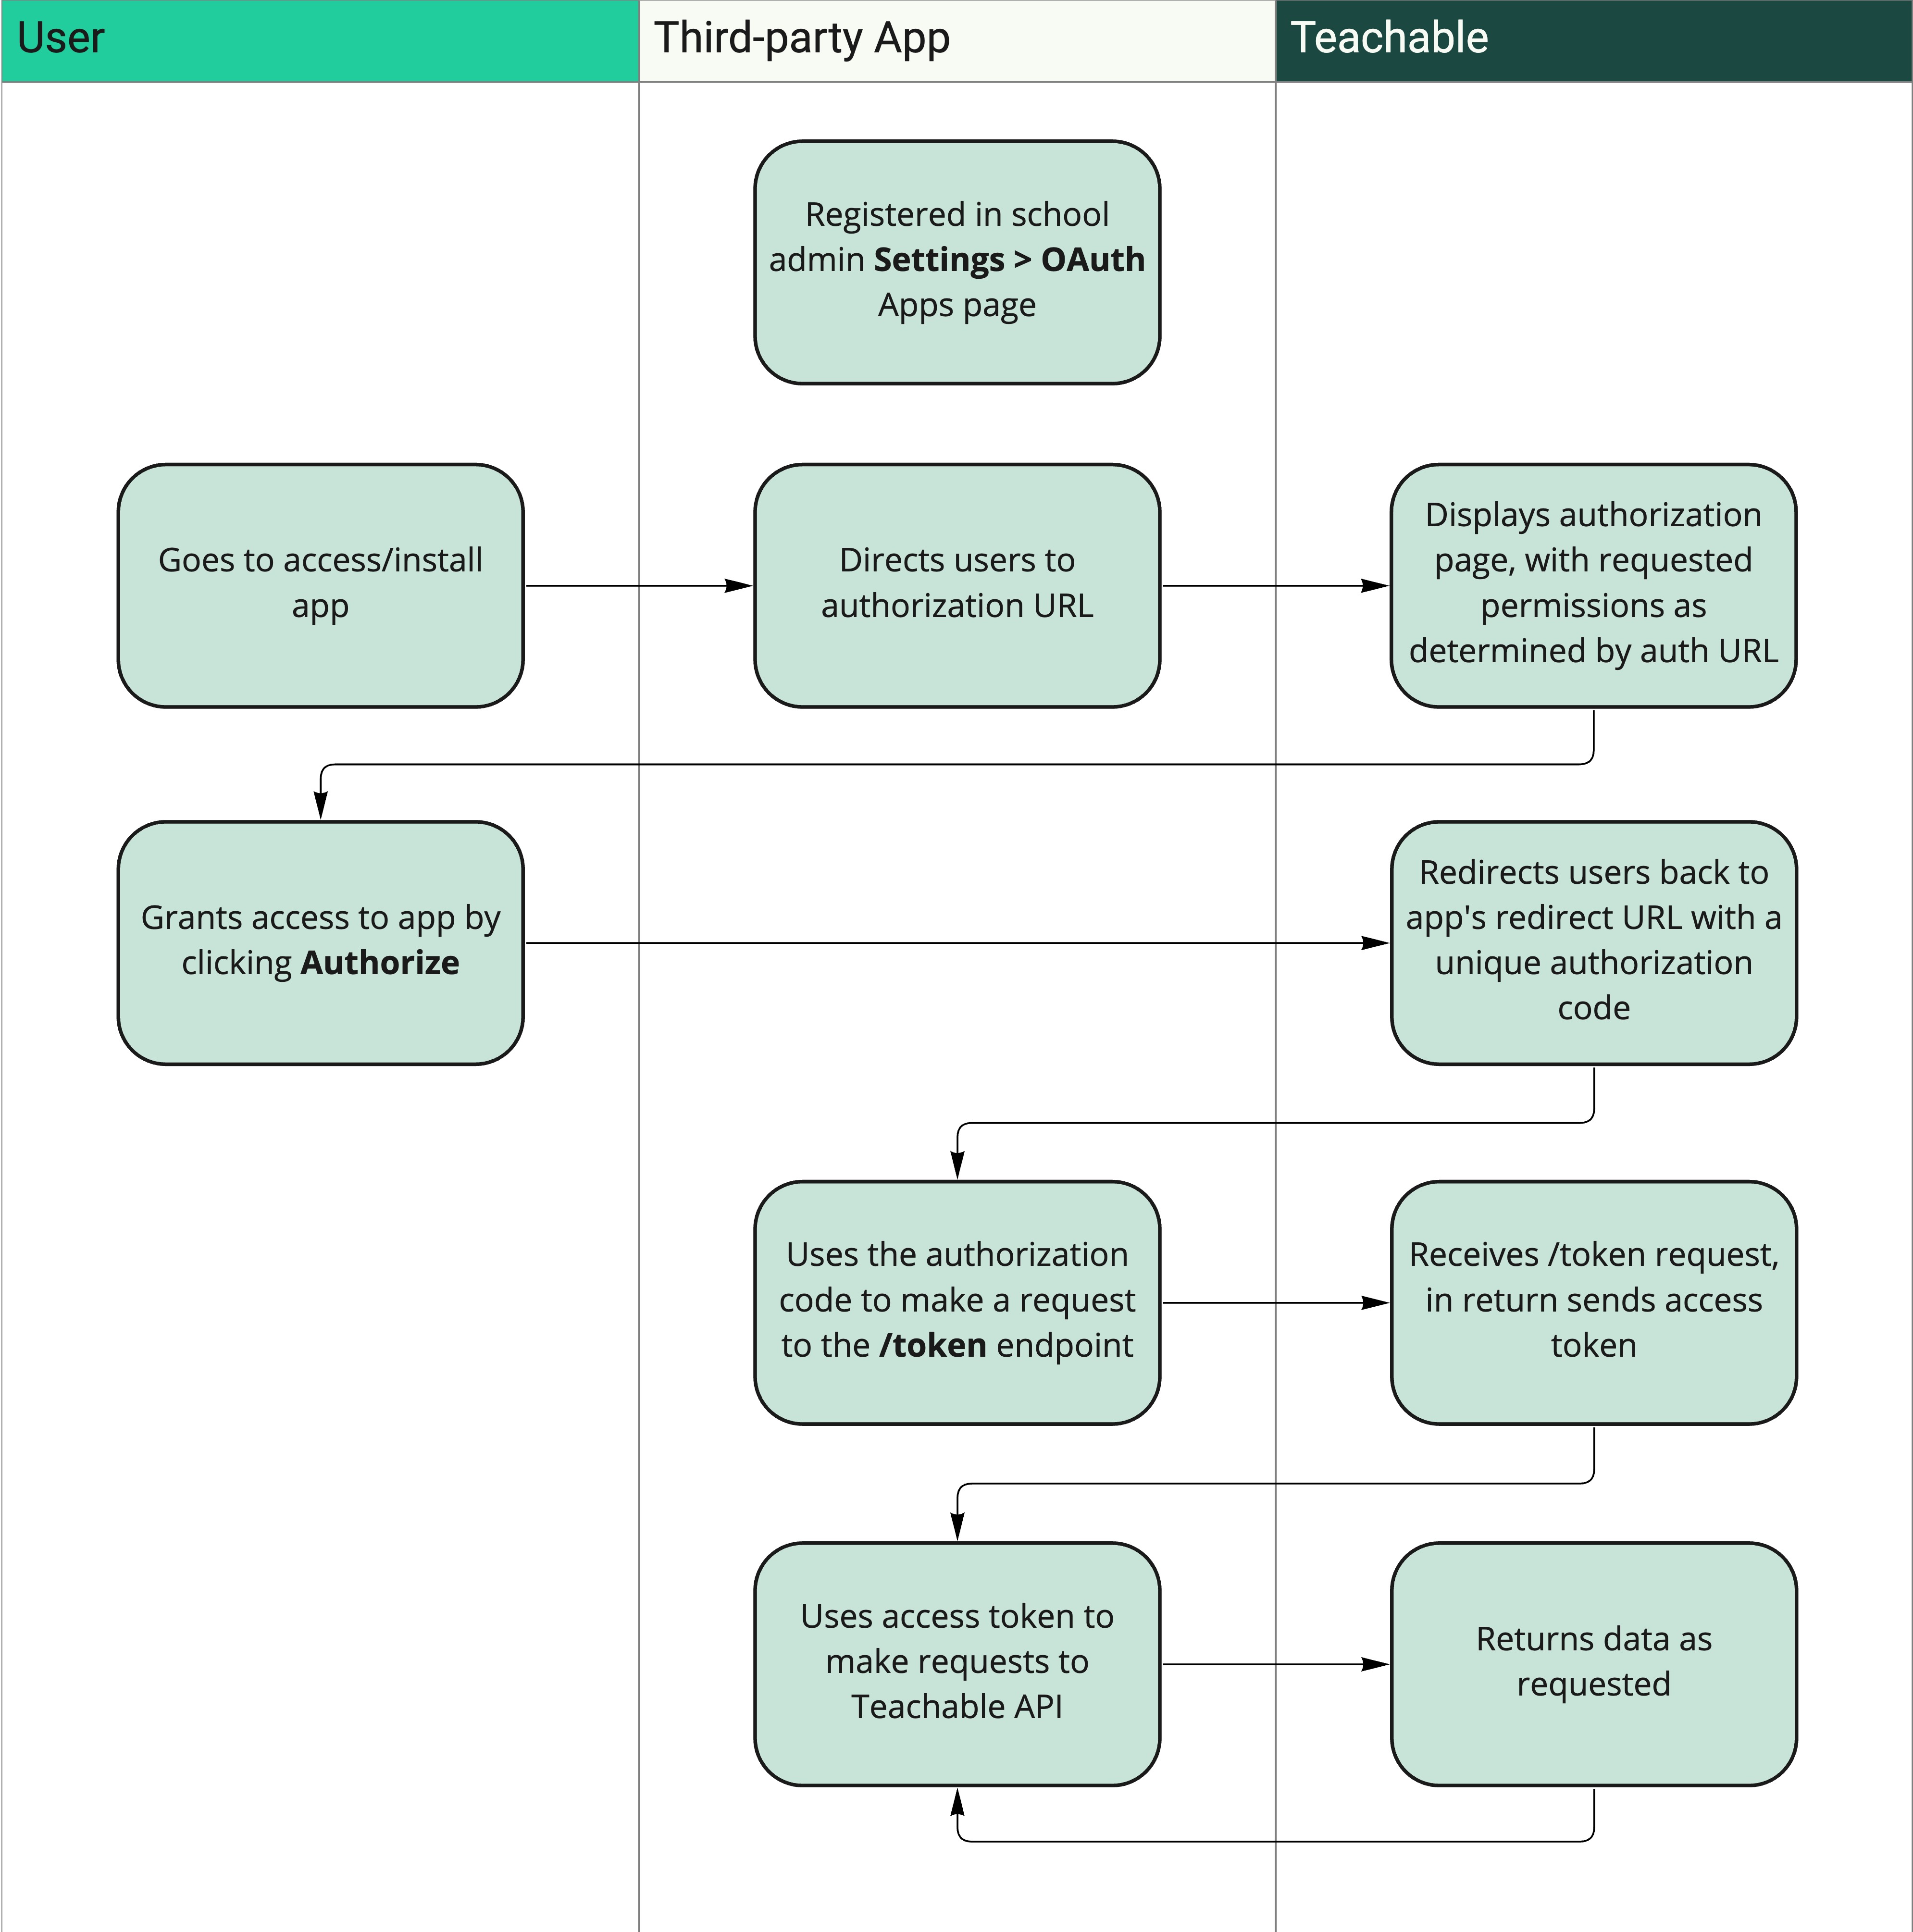
Below, we’ll walk through each step in more detail.
1. The school owner registers the third-party application from within their school admin.
Prior to building or connecting to the application, the school owner must register the app within their school admin. When the app is registered, a Client ID and Client Secret will be provided. The Client ID and Client Secret are later used to build an authorization URL and exchange authorization codes for access tokens.
To register the app:
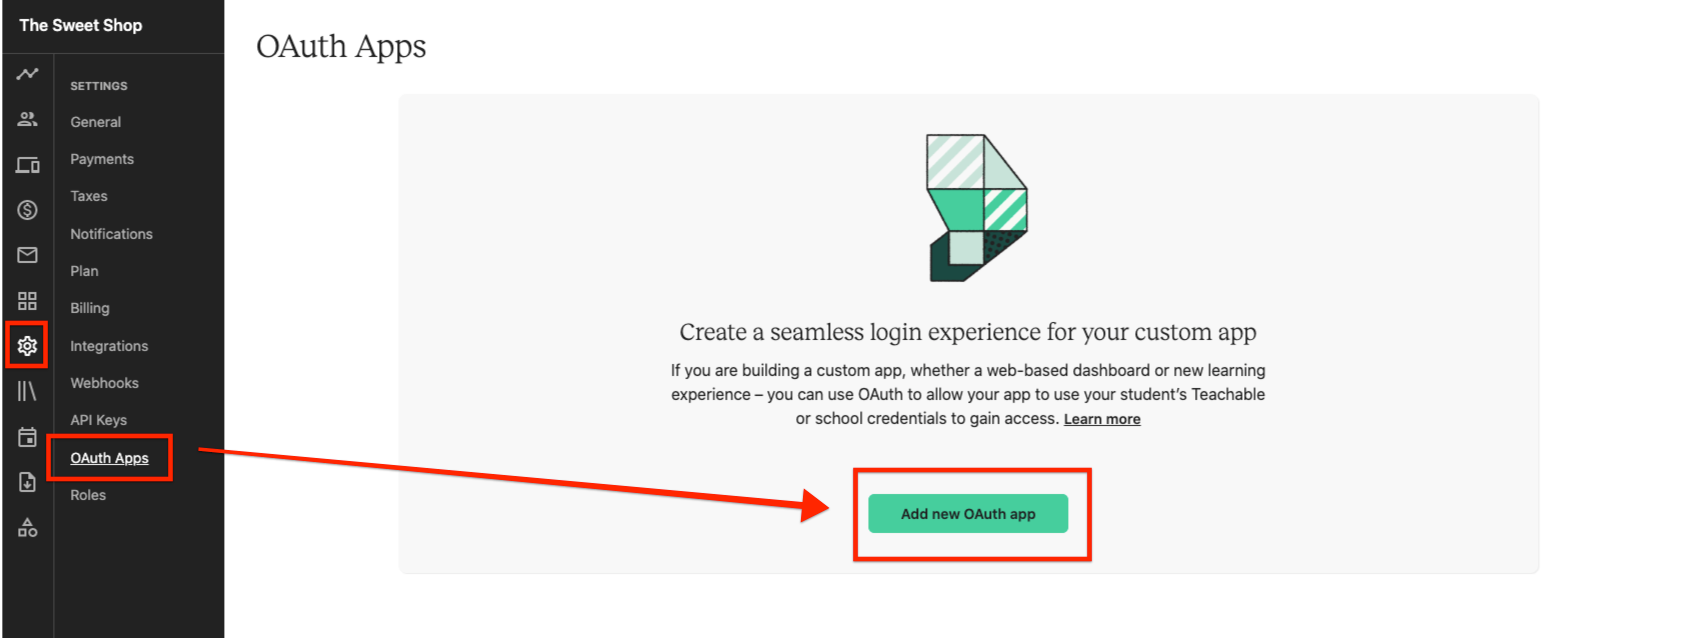
- From the school admin, navigate to the Settings > OAuth apps page.
- Click the Add new OAuth app button.
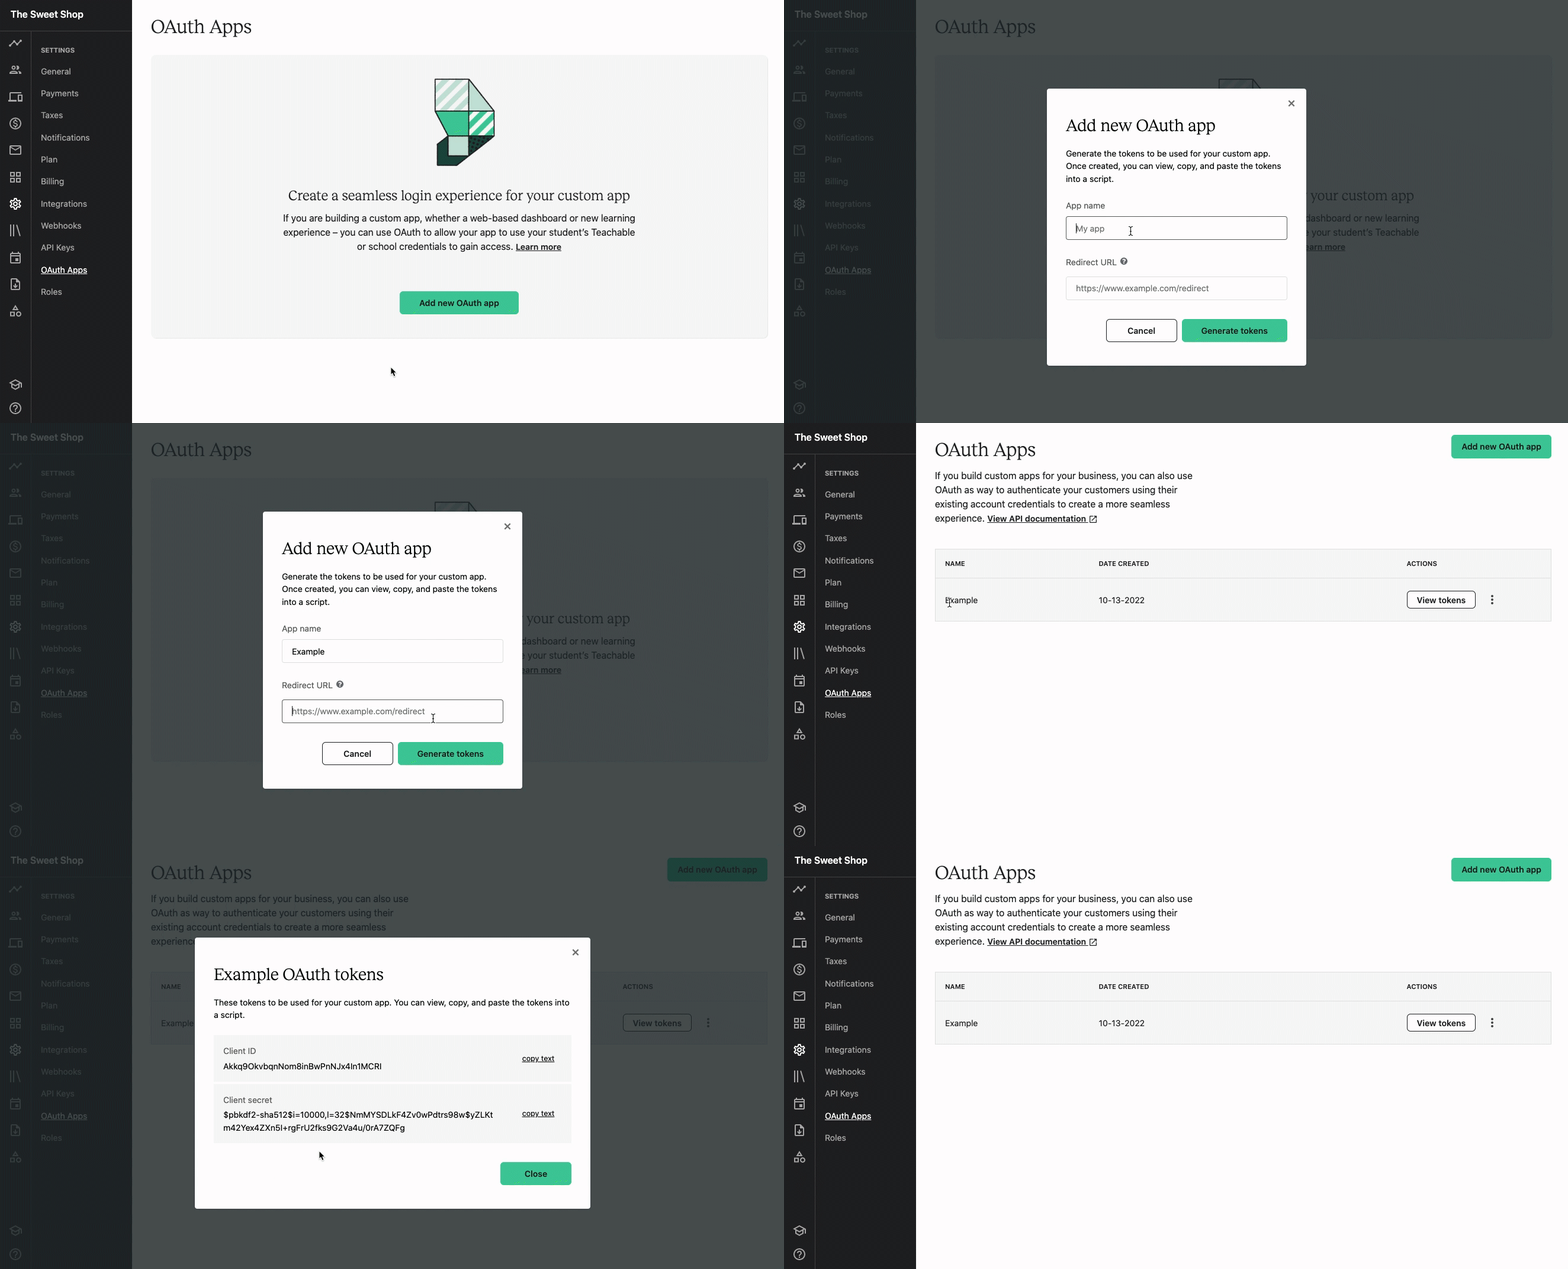
- In the popup window, enter in the following details:
a. App name - A name for the application you will be building or connecting to.
b. Redirect URL - The URL users will be redirected to after granting access to your app. The URL must includehttps://. - Click Generate tokens.
Once registered, you can click the View tokens button text to the application to view the Client ID and Client Secret for the app.
2. The user is directed to an authorization URL for the app.
Next, you need to direct your users to an authorization URL. This authorization URL identifies your app to the user and defines the permissions, or scopes, it's requesting access to on behalf of the user.
The base URL of the authorization URL is:
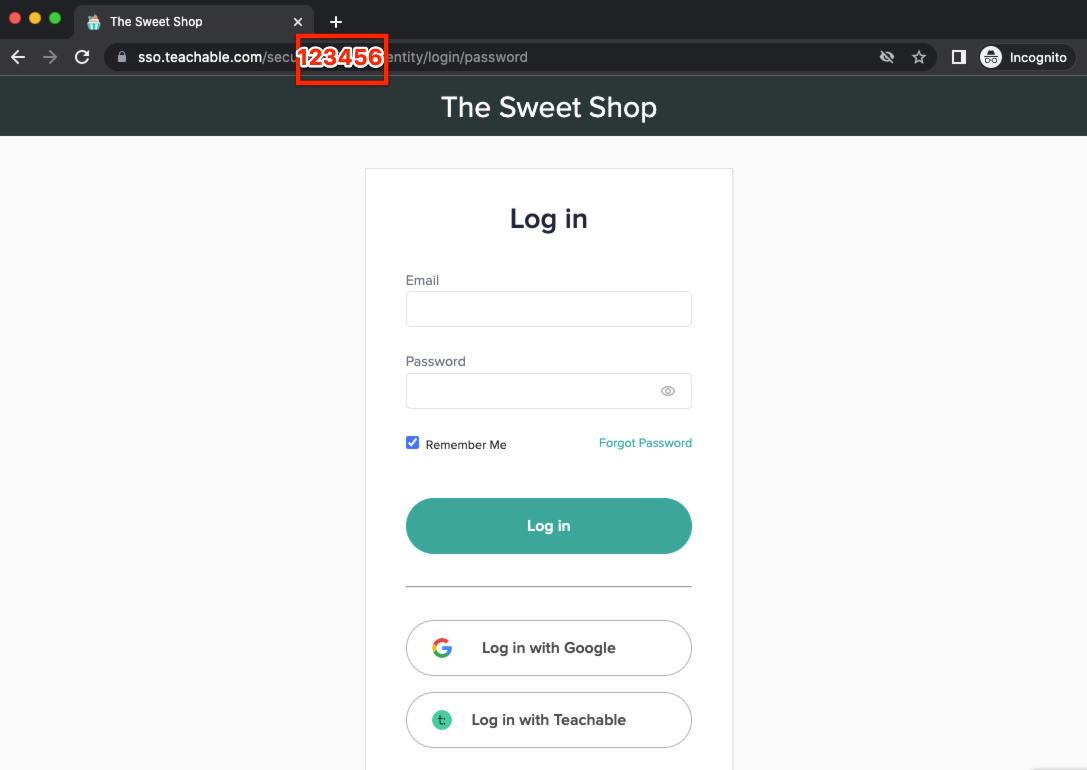
https://sso.teachable.com/secure/{school_id}/identity/oauth_provider/authorizeThe {school_id} value needs to be replaced with your unique school ID number. For example, if your school ID number is 12345, the base authorization URL would be:
https://sso.teachable.com/secure/12345/identity/oauth_provider/authorize
TipYou can find your unique school ID number in the login or checkout URL for your school.
There are several parameters you’ll need to add on to the base URL to complete the authorization URL. Use the below parameters and scopes to build the authorization URL:
| Parameter | Required? | Description |
|---|---|---|
| client_id | Yes | The Client ID of the app, retrieved in Step 1. |
| response_type | Yes | Value must always be code. |
| required_scopes | Yes | The required permissions that your app needs access to. Permissions are separated by space values (i.e., required_scopes=name:read%20email:read). |
| optional_scopes | No | The optional permissions that your app is requesting access to. Permissions are separated by space values (i.e., optional_scopes=courses:read%20name:read). |
| code_challenge | No | This supports Proof Key for Code Exchange (PKCE, RFC 7636) to improve security for mobile apps. If you include this parameter, you will later need to provide the corresponding code_verifier parameter to be able to exchange the authorization code for access token (in step 5). (We currently support the S256 code challenge method.) |
| state | No | This will be passed along when we redirect users to the redirect_uri (set in step 5), to help your app identify different sessions/requests made by different user |
The values for the required_scopes and optional_scopes parameters consist of scopes. Scopes are the specific permissions that the app is requesting access to.
The below scopes are available:
| Scope | Description |
|---|---|
| name:read | View the user’s name. |
| email:read | View the user’s email address. |
| courses:read | View the user’s enrolled courses. |
| courses:update | Update the user’s course enrollment course information. |
Use the appropriate parameters and scopes to build the authorization URL.
For example, below is a sample authorization URL:
https://sso.teachable.com/secure/12345/identity/oauth_provider/authorize?client_id=6789&response_type=code&required_scopes=name:read%20email:read&optional_scopes=courses:readIn the above example:
- The School ID value is
12345 - The Client ID value is
6789 - The response_type value is
code - The app is requesting access to the name:read and email:read scopes as required permissions, and requesting access to the courses:read scope as an optional permission
3. The user reviews the requested permissions and grants the app access.
When a user is directed to the authorization URL, they will be prompted to grant access to the app.
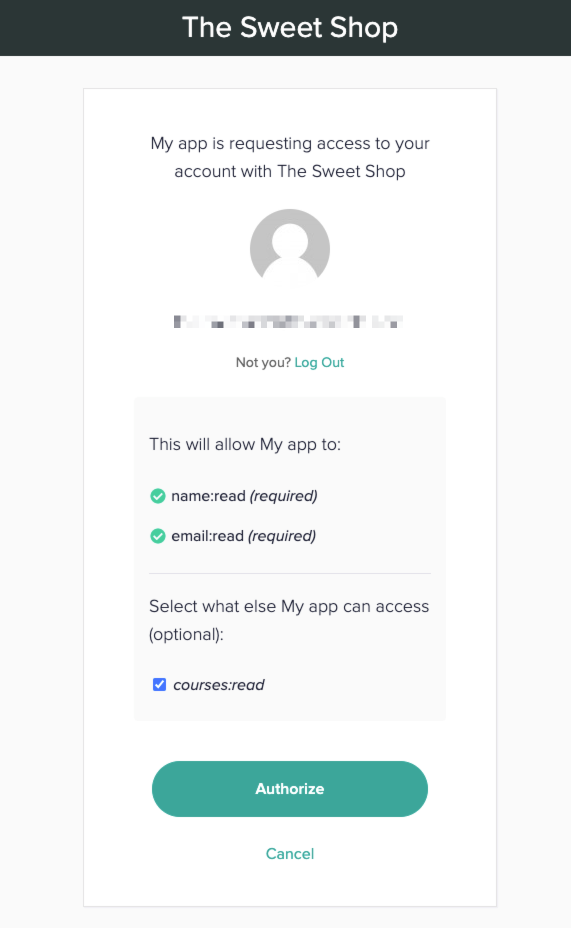
NoteIf the user is not logged in to their school account, they will be prompted to do so first. Once they are logged in, they will then be automatically redirected to the authorization page.
The listed required and optional permissions that the app is requesting access to will dynamically generate based on the scopes included in the authorization URL.
If the user approves of the request, they click Authorize.
If the user does not approve the request (i.e., they click the Cancel button on the authorization page), they will be redirected to the previous page and no further steps will be taken.
4. The user is redirected back to the app with a unique authorization code.
When a user clicks the Authorize button in the previous step, they are sent directly to the Redirect URL (as set in step 1). The request to the redirect URL will include an attached code query parameter.
For example:
https://www.example.com/redirect?code=abc&state=SOMESTATEIn the above example:
- The redirect URL is
https://www.example.com/redirect - The authorization code value is
abc - The state value is
SOMESTATE. Note that a state parameter is only included if you included state as a query parameter in the authorization URL in step 2.
If the user did not authorize the request (i.e., they click the Cancel button on the authorization page), they will be redirected to the previous page.
5. The app uses the authorization code to make a request to the Teachable OAuth API, and in exchange receives an access token.
Once the app receives the authorization code, it needs to make a POST request to the /token endpoint in order to exchange the authorization code for an access token.
As a part of the request, you must include the following data in the body of the request:
| Parameter | Description |
|---|---|
| code | The authorization code (received in step 4 above) |
| client_id | The Client ID of the app, retrieved in Step 1. |
| client_secret | The Client Secret of the app, retrieved in Step 1. |
| redirect_uri | The URL users will be redirected to after granting access to your app. This must match the Redirect URL set in Step 1 when registering the app. |
| grant_type | Value must always be authorization_code. |
| code_verifier | (Optional) If you send over code_challenge previously when making calls to the authorization page (step 2), you must pass the corresponding code_verifier to be able to exchange the authorization code for access token. This supports the Proof Key for Code Exchange (PKCE, RFC 7636) |
For example, below is a sample request:
curl -X POST \
  --url "https://developers.teachable.com/v1/current_user/oauth2/token" \
  --data "grant_type=authorization_code" \
  --data "client_id=1234" \
  --data "client_secret=5678" \
  --data "redirect_uri=https://www.example.com/redirect" \
  --data "code=abc" \
NoteThe content-type of request body could be either JSON or form-data.
In the above example:
- The grant_type value is
authorization_code - The client ID is
1234 - The client secret is
5678 - The redirect URL is
https://www.example.com/redirect - The authorization code value is
abc
On a successful request, a JSON body is returned with the following attributes:
| Value | Description |
|---|---|
| access_token | An access token to make secure requests. Access tokens expire after 7200 seconds (i.e., 2 hours). |
| token_type | Value is always bearer. |
| refresh_token | A token which can be used to request a new access token after the current one expires. |
| expires_in | The number of seconds until the provided access token expires. |
For example:
{
    "refresh_token": "xyz456",
    "token_type": "bearer",
    "access_token": "abc123",
    "expires_in": “7200”
}
In the above example:
- The access token value is
abc123 - The refresh token value is
xyz456 - The access token expires in 7200 seconds.
6. The access token is used to make API calls on behalf of the user.
After retrieving the access token, the app can now make calls to the Teachable API on behalf of the user.
For example, the below is a request to the /current_user/me endpoint, which returns the name and email of the user:
curl -X GET \
  --url "https://developers.teachable.com/v1/current_user/me" \
  --header "Authorization: bearer abc123"
In the above request, the access token abc123 is included in the header of the request as the authorization value.
Updated 5 months ago